MonitorX is a Zabbix non-official appliance dedicated to “XenApp” (which uses the XenApp 6.5 template). It allows you to monitor your XenApp 6.5 environment, including your Web Interface/StoreFront/NetScaler 10.x.
The appliance runs on a Debian Wheezy 7.8 (2 vCPU, 4Gb RAM and 40Gb thin provisioned disk), configured to use DHCP with the following modules:
- apache2
- mysql-server + mysql-client
- php5-mysql libapache2-mod-php5
- phpmyadmin
- zabbix 2.4.4
- zabbix agent 2.2.7
The default password for the root account is password!01 which we strongly recommend to change.
If you do not know anything about Zabbix, we recommend you to have a look at http://www.zabbix.com et http://www.monitoring-fr.org/solutions/zabbix/.
First, decompress the MonitorX.rar archive (607Mb). Once done, you get two folders :
- The OVA folder: contains the OVA file to import
- The Zabbix_Agent folder: contains the Zabbix Windows agent with the install script.
MonitorX appliance install procedure :
- Import the OVA file “MontorX.ova” into your preferred hypervisor (in our case ESXi 5.5)
- Configure the network settings if you do not wish to use DHCP. Pay attention that if you change the default hostname (ZAB01), you will have to update the hostname in Zabbix too (see the end of this blog entry).
- Connect through SSH (using PuTTY for example) and choose the menu entry number 5 using the root account password (password!01)
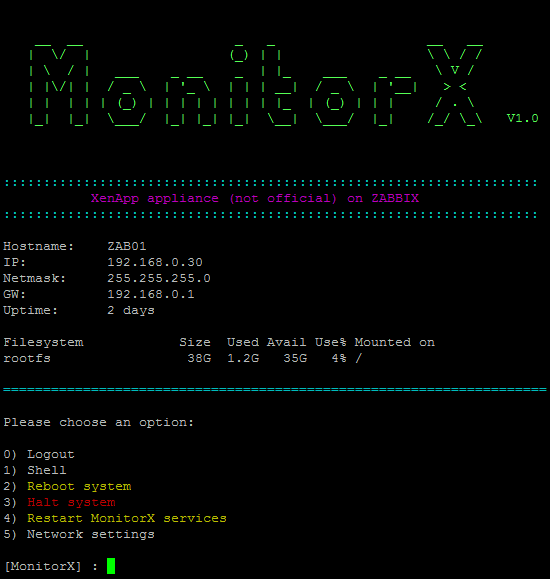
The Sexilog fans surely have recognized the SexiMenu 🙂
Open a browser and navigate to: “http://IPMonitorX”
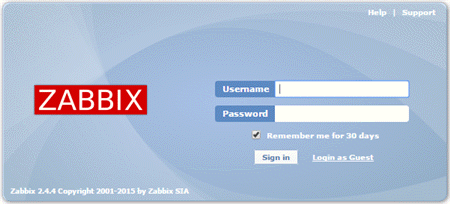 Enter the username (admin) and password (zabbix)
Zabbix server activation process :
- Go into the Configuration-Host menu
 Cliquez sur Disabled afin d’activer la supervision/monitoring serveur Zabbix
Adding hosts :
- Deploy the Zabbix agent on your XenApp servers
- Copy the “Zabbix_Agent_Install” folder on one of your XenApp admin server.
- In a PowerShell console, launch the “Zabbix_Agent_Install.ps1” script.
- Within the menu, you can :
– Modify the IP address of your Zabbix server (saved in the zabbix_agentd.win.conf file)
– Deploy the Zabbix agent on the XenApp farm members
– Open and modify the file holding the servers list on which you wish to deploy the agent (if you do not want to deploy the Zabbix agent on all your XenApp servers for example)
– Deploy the Zabbix agent on the servers listed in Servers.txt
 The first step is to replace the configured IP address of the Zabbix server by the IP address of your Zabbix server (menu 1).
Once the deployment done, a log file (StatutAgentInstall.txt) is available in the Zabbix_Agent_Install folder.
- Add you hosts in Zabbix
- Using the discovery rule called “XenApp_Discover” (Go into the Configuration-Discovery menu, modify the IP range of the “XenApp_Discover” rule, activate the rule and click Update).
- Add you hosts manually (for the brave ones 🙂 )
* Add the XenApp hosts in the “GRP_Citrix_XenApp_6.5” group
* Associate the XenApp hosts to the “TPL_Citrix_XenApp_6.5” template
* Associate the Web Interface / Storefront (Windows 2008 R2) to the “TPL_Windows_IIS_7.5” template.
If you’re using EdgeSight or UPM, you’ll have to enable the corresponding items in the “TPL_Citrix_XenApp_6.5” template.
Go into the Configuration-Template tab, click on TPL_Citrix_XenApp_6.5 and go to the items.
![]() Click on “Disabled” to enable the chosen items.
Click on “Disabled” to enable the chosen items.
Rename the Zabbix server (if you’ve renamed it in MonitorX):
- Connect through SSH
- Launch the following command “vi /etc/zabbix/web/zabbix.conf.php”

Modify the Zabbix hostname ($ZBX_SERVER = ‘ZAB01’; and $ZBX_SERVER_NAME = ‘ZAB01’;) and save the file (vi command “:wq”). If you’re allergic to vi, you can do the same operation through WinSCP.
If you don’t change the hostname in Zabbix, you will have the following error message:
Zabbix server is not running: the information displayed may not be current
![]() No worries, this message does not have any impact on the data collected by the Zabbix server.
No worries, this message does not have any impact on the data collected by the Zabbix server.
Admin access to the Zabbix database:
http://IpMonitorX/phpmyadmin ( root/password!01)
And here is the result.
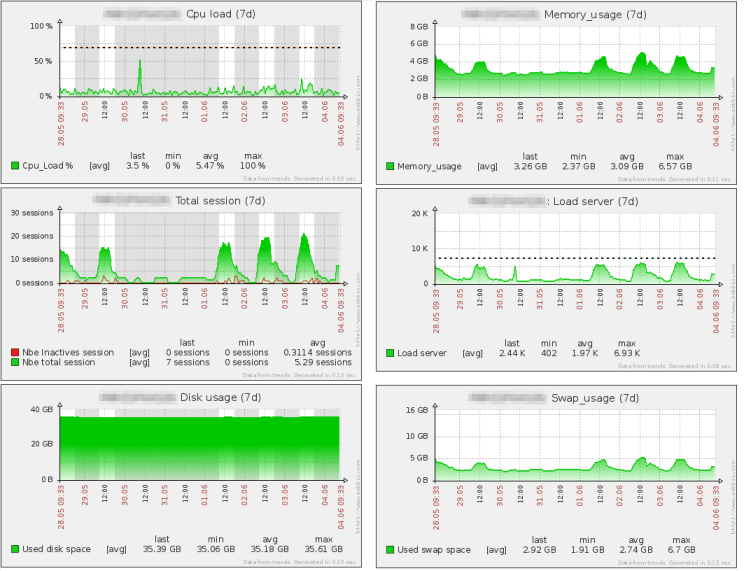 Graphs per host (Screen tab of each host)
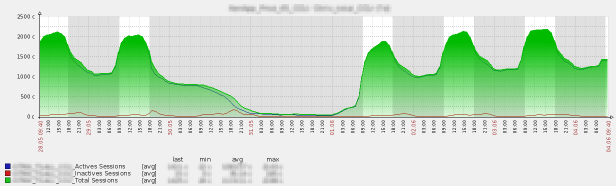
CCU usage graph of the XenApp farm (Monitoring-Screens tab)
 MonitorX.rar
Many thanks at Etienne Jeanneau for the translation.